
In the following post we will work on a rocky Linux server (RHEL).
Table of Contents
- Install EPEL Repository
- Install Clamav
- Set SELinux for Clamav
- freshclam: run Virus database signature update
- Enable local socket
- Create a systemd freshclam service that run freshclam once a day (or more)
- Start and Enable Clamd Scanner service and test it
- Important: control resources used by clamd service (CPU, memory and IO usage)
- On-Access Scanning: real time protection
- Execute clamonacc as a systemd service
- Test clamonacc On-Access scanning
- Evaluate ressources used by clamav solution
- Send notification when an infected file is detected (send an email or a teams notification via Microsoft Workflow)
- How to troubleshoot
Install EPEL Repository
The Rocky Linux base repo does not contain packages for installing Clamv.
dnf install epel-release -y
# update your system if you can
dnf update -y
Install Clamav
dnf install clamav clamd clamav-update
Set SELinux for Clamav
setsebool -P antivirus_can_scan_system 1
freshclam: run Virus database signature update
freshclam
Enable local socket
If you are setting up a simple, local clamd instance, then enable the LocalSocket option in its scan configuration file.
sed -i 's/#LocalSocket \/run/LocalSocket \/run/g' /etc/clamd.d/scan.conf
Create a systemd freshclam service that run freshclam once a day (or more)
You call manually freshclam to update database signatures.
But freshclam can be run in a daemon mode (run in the background) thanks to the following option:
-d, --daemon
Run in a daemon mode. Defaults to 12 checks per day unless otherwise specified by --checks or freshclam.conf.
You can ask the freshclam daemon to update the signature database once a day thanks to:
-c #n, --checks=#n
              Check #n times per day for a new database. #n must be between 1 and 50.
Then you should just execute “freshclam -d -c 1” and you’re done with freshclam. But if you reboot your server the freshclam won’t start automatically. That’s the reason why you need to create a freshclam systemd service.
If you execute the locate freshclam command you’ll find that there is already systemd configuration file for freshclam:
[root@Eclipse ~]# locate freshclam
/etc/freshclam.conf
/usr/bin/freshclam
/usr/lib/systemd/system/clamav-freshclam.service
/usr/lib64/libfreshclam.so.2
/usr/lib64/libfreshclam.so.2.0.2
/usr/share/man/man1/freshclam.1.gz
/usr/share/man/man5/freshclam.conf.5.gz
[root@Eclipse ~]#
vim /usr/lib/systemd/system/clamav-freshclam.service
[Unit]
Description = ClamAV Scanner
After=network-online.target

[Service]
Type = forking
#if you want to update database automatically more than once a day change the number 1
ExecStart = /usr/bin/freshclam -d -c 1
Restart = on-failure
PrivateTmp =true

[Install]
WantedBy=multi-user.target
Now save the file, and enable your service, and then start your service.
systemctl start clamav-freshclam
systemctl enable clamav-freshclam
systemctl status clamav-freshclam
Start and Enable Clamd Scanner service and test it
Clamd is the scanner service.
systemctl start clamd@scan
systemctl enable clamd@scan
systemctl status clamd@scan
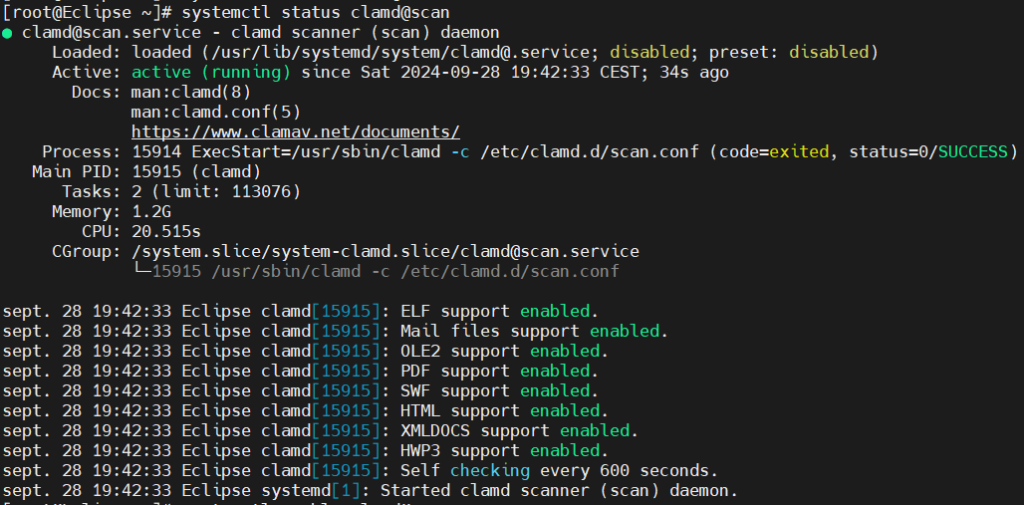
Now you can test it on a file:
clamscan filename
Or on a directory:
clamscan -r directoryname
Important: control resources used by clamd service (CPU, memory and IO usage)
Systemd services use cgroups to limit memory usage of your services: https://www.kernel.org/doc/Documentation/cgroup-v2.txt
https://www.freedesktop.org/software/systemd/man/latest/systemd.resource-control.html
MemoryAccounting
When you set MemoryAccounting, it enables explicitly the memory cgroup controller.
But as specified https://www.freedesktop.org/software/systemd/man/latest/systemd.resource-control.html there is no need to enable explicitly a cgroup controller “for a given unit when this unit has configuration for a given controller. For example, when CPUWeight= is set, the cpu controller will be enabled”.
MemoryAccounting=true => when enabled explicitly or implicitly if you use for instance MemoryHigh configuration, you’ll be able to see statistics about the memory usage of your service (because memory usage is constantly analyzed, this costs some resources, but is negligible).
Usually it’s already enabled via a higher configuration option DefaultMemoryAccounting.
systemctl show clamd@scan -p MemoryCurrent
MemoryHigh
If the memory usage of your server is critical you may consider using memory.max, but in this case the OOM killer is invoked in the cgroup if MemoryMax is exceeded, the clamd will be killed.
In this article, we’ll set MemoryHigh: “Specify the throttling limit on memory usage of the executed processes in this unit. Memory usage may go above the limit if unavoidable, but the processes are heavily slowed down and memory is taken away aggressively in such cases. This is the main mechanism to control memory usage of a unit.”
MemoryHigh=1500M
CPUWeight
“These options control the “cpu.weight” control group attribute. The allowed range is 1 to 10000. Defaults to unset, but the kernel default is 100. The available CPU time is split up among all units within one slice relative to their CPU time weight.”
CPUWeight=50
CPUQuota
“Example: CPUQuota=20% ensures that the executed processes will never get more than 20% CPU time on one CPU.”
CPUQuota=20%
IOWeight
“Set the default overall block I/O weight for the executed processes, if the unified control group hierarchy is used on the system. Takes a single weight value (between 1 and 10000) to set the default block I/O weight. This controls the “io.weight” control group attribute, which defaults to 100.”
“A higher weight means more I/O bandwidth, a lower weight means less.”
We do not want to let clamav a normal IO priority, so we decrease its value:
IOWeight=50
Edit your systemd clamd service configuration
Now your clamd service configuration file looks like this /etc/systemd/system/multi-user.target.wants/clamd@scan.service :
[Unit]
Description = clamd scanner (%i) daemon
Documentation=man:clamd(8) man:clamd.conf(5) https://www.clamav.net/documents/
After = syslog.target nss-lookup.target network.target

[Service]
Type = forking
ExecStart = /usr/sbin/clamd -c /etc/clamd.d/%i.conf
# Reload the database
ExecReload=/bin/kill -USR2 $MAINPID
Restart = on-failure
TimeoutStartSec=420
### ! Here is your cgroup resource control ! ###
MemoryHigh=1500M
CPUWeight=50
CPUQuota=20%
IOWeight=50


[Install]
WantedBy = multi-user.target
On-Access Scanning: real time protection
Instead of manually scan a suspicious file you can enable the On-Access scanning protection in order each time a new file is copied or downloaded it is scanned by clamd.
You can choose to protect your whole filesystem, or only some directories. The last case can be interesting if you develop an application in which users can upload some files.
Activate on-access scanning
We will modify the clamd service options (by editing /etc/clamd.d/scan.conf), then first you need to stop clamd service:
systemctl stop clamd@scan
Now choose which kind of protection you want: https://docs.clamav.net/manual/OnAccess.html#configuration-and-recipes
Here the three use cases given by the official documentation:
- User needs to watch the entire file system, but blocking malicious access attempts isn’t a concern (notify-only mode)
- System Administrator needs to watch the home directory of multiple Users, but not all users. Blocking access attempts is un-needed. (notify-only mode)
- The user needs to protect a single directory non-recursively and ensure all access attempts on malicious files are blocked.
In this blog post we will set the third use case’s configuration: active protection with malicious files blocked.
Edit the configuration file of clamd /etc/clamd.d/scan.conf, and ensure the following lines are present:
ScanOnAccess yes ## only for old versions <= 0.101.x , not needed after 0.101.x
OnAccessExcludeUname clamscan ## versions >= 0.102
OnAccessPrevention yes
OnAccessDisableDDD yes
The user for OnAccessExcludeUname is already specified and is clamscan user but it could be clamav depending on the clamav version you’ve installed. You shouldn’t change the user value, it’s correct by default. This user is the user that executes the clamd service
In /etc/clamd.d/scan.conf you can find the name of the user:
cat /etc/clamd.d/scan.conf | grep User
sed -i 's/#OnAccessExcludeUname clamscan/OnAccessExcludeUname clamscan/g' /etc/clamd.d/scan.conf
sed -i 's/#OnAccessExcludeUname clamav/OnAccessExcludeUname clamscan/g' /etc/clamd.d/scan.conf
sed -i 's/#OnAccessPrevention yes/OnAccessPrevention yes/g' /etc/clamd.d/scan.conf
sed -i 's/#OnAccessDisableDDD yes/OnAccessDisableDDD yes/g' /etc/clamd.d/scan.conf
Choose path you want to automatically scan:
OnAccessIncludePath /path/you/want/to/scan
OnAccessExcludePat /path/you/want/to/scan/safedir
OnAccessExcludePat /path/you/want/to/scan/safedir2
Start clamd service:
systemctl start clamd@scan
Execute clamonacc as a systemd service
If you want clamonacc to be executed after you reboot your linux server, then you configure clamonacc as a systemd service, and then enable the clamonacc service.
[root@Eclipse ~]# locate clamonacc
/usr/lib/systemd/system/clamav-clamonacc.service
/usr/lib/systemd/system/clamonacc.service
/usr/sbin/clamonacc
/usr/share/man/man8/clamonacc.8.gz
[root@Eclipse ~]# ll /usr/lib/systemd/system/clamav-clamonacc.service
-rw-r--r--. 1 root root 519  5 sept. 06:04 /usr/lib/systemd/system/clamav-clamonacc.service
[root@Eclipse ~]# ll /usr/lib/systemd/system/clamonacc.service
lrwxrwxrwx. 1 root root 24  5 sept. 06:07 /usr/lib/systemd/system/clamonacc.service -> clamav-clamonacc.service
Edit the file /usr/lib/systemd/system/clamonacc.service and copy-paste the following lines:
[Unit]
Description=ClamAV On-Access Scanner
Documentation=man:clamonacc(8) man:clamd.conf(5) https://docs.clamav.net/
Requires=clamd@scan.service
After=clamd@scan.service syslog.target network-online.target

[Service]

Type=simple
User=root
ExecStart=/usr/sbin/clamonacc --fdpass -F --config-file=/etc/clamd.d/scan.conf --log=/var/log/clamonacc --move=/tmp/clamav-quarantine
Restart=on-failure
RestartSec=7s

[Install]
WantedBy=multi-user.target
Inside ExecStart you can see the important option –fdpass, without this option you will have permission denied errors on the OnAccessIncludePath. If you more information on this option just do ‘man clamonacc’
The –move option defines where moving the infected files.
mkdir /tmp/clamav-quarantine

systemctl daemon-reload
systemctl start clamonacc
systemctl enable clamonacc
systemctl status clamonacc
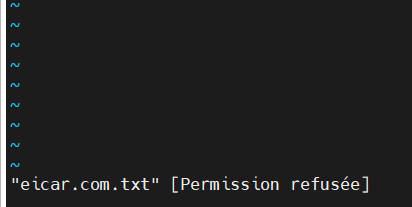
Test clamonacc On-Access scanning
Go to the directories that you’ve define earlier in the OnAccessIncludePath configuration.
And then download the eicar.com.txt file, the famous file for safely Antivirus testing:
wget https://secure.eicar.org/eicar.com.txt
vim eicar.com.txt
When you try to edit the eicar.com.txt file with vim, you’ll get a message “eicar.com.txt [Permission denied]” => you are blocked from opening and reading the file. And at this moment the –move=/tmp/clamav-quarantine will be applied: the eicar.com.txt is automatically moved by clamonacc service to the directory /tmp/clamav-quarantine
You can verified the /var/log/clamonacc file:

If you are on a RHEL distro, you can also see the event inside /var/log/messages:

Evaluate ressources used by clamav solution
ps -aux | grep clam | grep -v grep
[root@Eclipse ~]# ps -aux | grep clam | grep -v grep
clamupd+   12126  0.0  0.0  26724  5760 ?        Ss   19:32   0:00 /usr/bin/freshclam -d -c 1
clamscan   22654  0.9  7.4 1583540 1355264 ?     Ssl  19:59   0:21 /usr/sbin/clamd -c /etc/clamd.d/scan.conf
root       29770  0.0  0.0 270324 10624 ?        Ssl  20:17   0:00 /usr/sbin/clamonacc --fdpass -F --config-file=/etc/clamd.d/scan.conf --log=/var/log/clamonacc --move=/tmp/clamav-quarantine
Then you have the process PID implied in clamav solution:
top -p 12126,22654,29770
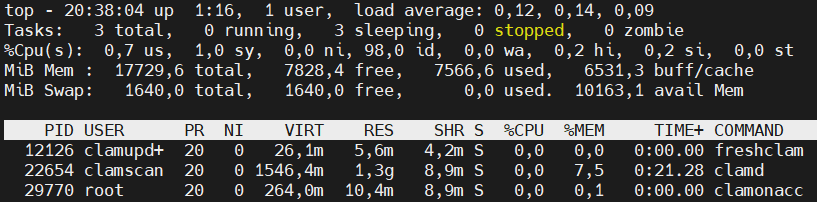
If you look at the ‘VIRT’ column (The total amount of virtual memory used by the task. It includes all code, data and shared libraries plus pages that have been swapped out and pages that have been mapped but not used) you can see: 26,1 + 1546,4 + 264 = 1836,5 MBytes of RAM
Also don’t forget you have set some kind of boundaries for CPU,RAM and IO (have a look to “control resources used by clamd service (CPU and memory usage)”).
Send notification when an infected file is detected (send an email or a teams notification via Microsoft Workflow)
Clamd service allow us to trigger a shell command line when detecting an infected file. You have to set the VirusEvent inside clamd service configuration file. For instance, edit /etc/clamd.d/scan.conf and set this:
# Execute a command when virus is found.
# Use the following environment variables to identify the file and virus names:
# - $CLAM_VIRUSEVENT_FILENAME
# - $CLAM_VIRUSEVENT_VIRUSNAME
# In the command string, '%v' will also be replaced with the virus name.
# Note: The '%f' filename format character has been disabled and will no longer
# be replaced with the file name, due to command injection security concerns.
# Use the 'CLAM_VIRUSEVENT_FILENAME' environment variable instead.
# For the same reason, you should NOT use the environment variables in the
# command directly, but should use it carefully from your executed script.
# Default: no
#VirusEvent /opt/send_virus_alert_sms.sh
VirusEvent "/usr/local/src/sendMailNotifClamav.sh"
Now inside /usr/local/src directory create the following three files.
Firstly the sendMail.sh file, a generic file to send email with curl, you’ll be able to reuse for other processes if you want:
###########
#!/bin/bash
# Author: https://nicodevlog.com
# This script send an email to an existing smtp server

# Read of parameter
HOST=$1
MAIL_FROM=$2
MAIL_TO=$3
SUBJECT=$4
CONTENT=$5

CLEAN_MAIL_TO=$(echo $MAIL_TO | sed "s/'//g")       # Remove simple quote present in MAIL_TO
ESCAPED_CONTENT=$(echo "$CONTENT" | sed 's/"/\"/g') # Escape double quotes
IFS=';'
for email in $CLEAN_MAIL_TO
do
  curl smtp://${HOST} --mail-from "$MAIL_FROM" --mail-rcpt "$email" -T <(echo -e "From: ${MAIL_FROM}\nTo: ${email}\nContent-type: text/plain;charset=utf-8\nSubject: ${SUBJECT}\n\n${ESCAPED_CONTENT}")
done
IFS=$' \t\n'
Secondly create the sendMailNotifClamav.sh file that is called by VirusEvent:
###########
#!/bin/bash
# Author: https://nicodevlog.com
# This script send an email to an existing smtp server and give information about a virus threat detected
BASEDIR=$(dirname $0)
SUBJECT="Server $HOSTNAME is infected"
CONTENT="The server $HOSTNAME is infected by the file $CLAM_VIRUSEVENT_FILENAME, Virus name: $CLAM_VIRUSEVENT_VIRUSNAME"

# Read of parameter
source $BASEDIR/sendMailNotifClamav.conf

$BASEDIR/sendMail.sh "${SMTP_HOST}" "${MAIL_FROM}" "${MAIL_TO}" "${SUBJECT}" "${CONTENT}"
CLAM_VIRUSEVENT_FILENAME and CLAM_VIRUSEVENT_VIRUSNAME are environment variables
And finally create the sendMailNotifClamav.conf file:
SMTP_HOST='yoursmtpserver.nicodevlog.com'
MAIL_FROM='no-reply@nicodevlog.com'
MAIL_TO='youremail@nicodevlog.com'
This last file is created in order to separate these 3 variables SMTP_HOST, MAIL_FROM, MAIL_TO from the source code. And then it’s easier to automate its deployment with various values (for instance automate its deployment with Ansible).
SELinux: Authorize the curl function to be called by VirusEvent on the port 25. Otherwise you will have an error setroubleshoot visible inside /var/log/messages if you are on RHEL.
Then you create a SELinux policy rule for curl:
ausearch -c "curl" --raw | audit2allow -M my-curl
semodule -X 300 -i my-curl.pp
To send a notification with Teams, it’s the same idea, you just need to create the equivalent of sendEmail.sh for teams, and use Workflow URL (because Teams webhook will be deprecated by the end of the year 2024).
You can have a look to this link from somebody who wrote a script for sending Teams notifications via Microsoft workflow: https://gist.github.com/chusiang/895f6406fbf9285c58ad0a3ace13d025
How to troubleshoot
In case you face some errors, you can activate the –debug option:
vim /etc/systemd/system/multi-user.target.wants/clamd@scan.service and add –debug in ExecStart:
ExecStart = /usr/sbin/clamd --debug -c /etc/clamd.d/%i.conf
Also verify the content of the following log files:
/var/log/messages (under RHEL)
/var/log/clamonacc
Leave a Reply